A Brief History of The (Second) Boer War
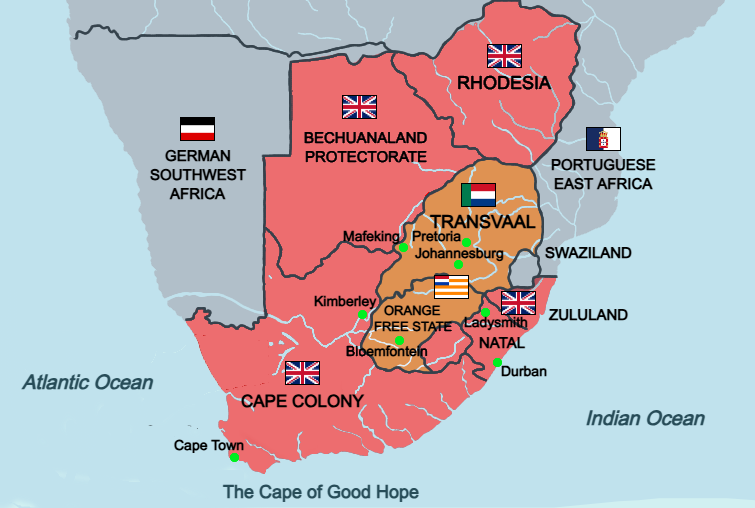
Before the Boer War, the political geography of South Africa was divided between British controlled coastal regions and Boer republics within the interior. The British Empire dominated much of the coastline throughout the Cape Colony in the south west and Natal in the south east. This gave them access to key ports such as Cape Town and Durban. In contrast, the Boer republics, which were the South African Republic and the Orange Free State, were landlocked and located in the interior, making them difficult to access. The map below highlights how the Boer States, including their key cities, such as Johannesburg and Pretoria were surrounded by large British territories such as the Bechuanaland Protectorate and Rhodesia, highlighting the strategic imbalance between the British coastal power and Boer inland independence. This became a huge factor in the rising tensions that eventually led to the Boer Wars.
In 1852, a Welsh mineralogist named John Henry Davis discovered a small amount of gold on the Paardekraal farm, Krugersdorp, in the Transvaal, a part of the South African Republic. This ultimately led to the discovery by George Harrison and his colleague, in 1886, of the largest supply of gold the world had ever found at that time. This became known as the Witwatersrand Gold Rush.
The Witwatersrand Gold Rush caused an influx of foreign gold miners, referred to by the Boers as Uitlanders (foreigners) to travel to the Witwatersrand Plateau where the search for gold took place. Many of these men were from the British Cape Colony. They were initially welcomed because they helped to bolster the gold-mining economy. Later, the Uitlanders became discontented due to the denial of political, legal and civic rights, which they believed they deserved. In 1888 laws to reinforce Boer cultural dominance were introduced. These laws required the Dutch language to be used in all legal proceedings. The Uitlanders saw this as a major barrier for them to be successful. The Uitlanders were the driving force in gold mining, but they felt that the Boer government over-taxed the mining industry, failed to provide a proper working infrastructure, or provide them with any political or civic rights. They saw this as very unfair.
The discontentment of the Uitlanders helped to fuel a political crisis that Britain felt it could exploit and the Transvaal Government could not defuse. As Uitlanders complained about political exclusion, heavy taxation and poor services, pro-British groups such as the ‘South African League’ publicised these issues widely and often exaggerated them for political gain. The publicity gained great prominence. By this time, the Uitlander population in the Transvaal had grown larger than the population of the Boers, yet they still lacked meaningful political rights. This imbalance created an increasingly volatile situation.
In 1895-96, the British backed the Jameson Raid, carried out by British colonial administrator and politician, Leander Starr Jameson, under the leadership of Cecil Rhodes, a British mining magnate and Prime Minister of the Cape Colony. The initial idea was that 500 Paramilitary British South Africa Company police officers would be sent from Rhodesia for the New Year weekend of 1895-96 to trigger an uprising of the British Uitlanders, that would see the rise of a Pro-British government. The raid proved ineffective and the uprising did not occur. This whole ordeal was a large embarrassment to the British Government, who swiftly replaced Cecil Rhodes as prime minister of the Cape Colony. After the raid, the Boers maintained dominance within the Transvaal.
In 1899, the President of the Orange Free State, Martinus Theunis Steyn, instigated a series of talks known as the ‘Bloemfontein Conference’ in order to settle disputes between the South African Republic State President Paul Kruger, and the British High Commissioner Alfred Milner. They took place between May 31st and June 5th. The Conference was held at a railway station in the Capital of the Orange free State, Bloemfontein. The meeting was set up to discuss the status of British Uitlanders and the mining activities in the Transvaal. It was seen as the last real possibility of avoiding a war between the two states.
At the Conference, High Commissioner Milner made three demands of President Kruger:
The South African Republic would enact a law that would enable Uitlanders the right to vote.
Allow the English language to be spoken in the Volksraad, the parliament of the South African Republic.
All laws of the Volksraad must also be approved by the British Parliament.
Kruger countered these demands by making an offer to lower the citizenship requirements for Uitlanders from twelve years to seven years. He also made it clear that Milner’s list of demands were impossible to meet. Milner refused to compromise on his original demands, despite encouragement to continue negotiations, endorsed by the British Colonial Secretary, Joseph Chamberlain, Milner left the talks on the 5th of June with no decision reached as to the fate of the Uitlanders.
In October 1899, in fear of losing both political power and its stake in the Transvaal gold trade, Britain sent ten thousand men to South Africa, in an attempt to address the escalating tension with the Boer Republics. By October 11th, President Kruger had declared war on Britain. The war contained three phases:
The first phase of the war in 1899, was conventional warfare of the era, in which the Boer forces launched attacks on the British held territories in Natal and the Cape Colony. The British defence effort was led by General Sir Redvers Buller, VC. It did not go well. The Boers besieged towns such as Kimberley, Ladysmith and Mafeking. In this early phase of the war, the Boers had many victories and much success, but the sieges were prolonged and resource intensive. Ultimately the Boers lacked the manpower and logistical capability to secure many more victories after these initial gains.
In the second phase of the War in 1900, a large group of reinforcements were sent from Britain. They were led by Field Marshal Lord Roberts with Lord Kitchener, serving as his chief of staff, later becoming his successor. The newly arrived land forces would quickly relieve the Boer sieges in British territory. They then pushed forward to invade Boer territory. This large force had one hundred and eighty thousand men. The Boer political class, well aware that they would be unable to face such a substantial force using conventional war methods, fled into hiding. This in turn allowed for British forces to annex the two republics by the end of 1900. The South African Republic would become the Transvaal Colony on 1st September 1900, later formalised on 31st May 1902. The Orange Free State would become The Orange River Colony in 1900, formalised later in 1902.
In the third phase of the war, as conventional battlefield engagements turned in Britain’s favour, Boer Commanders began to use guerilla tactics, replacing conventional battle tactics with sabotage, ambushes, the destruction of the railways and the railway infrastructure. The Boers also made sudden raids, launched from rural civilian locations. This transition prolonged the conflict and began to blur the line between combatant and civilian, as fighters often operated without any recognised uniform and relied on sympathetic farmsteads for shelter and supplies.
These warfare tactics are now considered as military adaptiveness. However, these methods drew criticism under the laws of war at the time, including the principles outlined in the Hague Conventions of 1899. These principles sought to formalise the distinction between lawful combatants and civilians, in order to protect non-combatants from participation in hostilities. The non-combatant involvement from rural villages, whether voluntary or coerced, fuelled the British claims that Boer resistance undermined international rules and violated the norms of warfare, Boer commandos would operate in small mobile units and sometimes executed Boer and Black African Civilians suspected of collaborating with the British and there would be instances of harsh treatment of prisoners and the destruction of property belonging to perceived British loyalists. While these actions were often justified by the Boers as necessary in a resistance campaign against a much larger enemy, they would nevertheless contribute to the overall brutality of the war.
In response to the Boer’s shift to guerilla warfare, the British implemented what they called a sweeping counter-insurgency campaign, designed to deprive the Boers of mobility, intelligence and civilian support. Under the command of Lord Kitchener, the British began to adopt a horrific systematic scorched earth policy. Farms suspected of aiding Boer fighters were burned to the ground, crops destroyed, water wells contaminated and livestock seized or slaughtered. Tens of thousands of rural civilians, including Boer women and children were removed from their land and placed in concentration camps, as a means of removing the supply networks provided by some civilians for Boer guerilla fighters. There were also large numbers of Black African men, women and children who the British feared would sympathise with the Boers were placed in these camps. Disease spread quickly in the camps due to inhumane conditions. There were often outbreaks of measles, typhoid and dysentery. The camps were overcrowded, poorly supplied with food and medicines and inadequately administrated, especially in their early stages. The mortality rates in these camps was extremely high. It is estimated at more than 26,000 Boers and at least 20,000 Black Africans died in them.
The British also constructed an extensive network of ‘blockhouses’, which were small fortified posts linked by barbed wire fences spread across the South African countryside. The landscape was turned into fragmented sectors and the railway lines were heavily guarded. The railways were often used for the deportation of Boer prisoners to far off Prisoner of War camps in various distant regions of the British Empire, such as India or Ceylon. While these measures ultimately constrained Boer mobility and contributed to British success, they generated profound humanitarian suffering and, even at the time, experienced major international criticism. Eventually reports by observers such as Emily Hobhouse exposed camp conditions to the British public, prompting official investigation. Ultimately, major reform took place, although not before significant unnecessary loss of life had occurred. The war ended, largely due to these actions, in 1902. The Boer states were then transformed into the British colonies of the Transvaal and Orange River. In 1910 they were merged with Natal and Cape Colony to form the Union of South Africa, a self-governing colony within the British empire.
It is essential, when assessing the British conduct of the Second Boer war, to distinguish between high-level policy and the ordinary men who carried it out. The vast majority of British soldiers in South Africa were seeking stable employment, a sense of adventure, or the opportunity to serve their country as patriots. They were not architects of strategy, but Privates and Junior Officers drawn from industrial towns, rural villages and across the Empire. Many had little formal education and a limited understanding of the political or legal debates surrounding the war. They served under commanders such as Lord Kitchener, with a rigid military hierarchy. Obedience to orders was not optional, but foundational to discipline and survival. Refusal could mean court martial, imprisonment, social disgrace or even death. It is also important to note that not all units of the British Army deployed in the Boer War were involved directly in scorched earth operations or camp administration. Large numbers of these units served in logistical roles, such as guarding railways or fighting Boer soldiers in the field under conventional combat conditions.
The Wikipedia entry for the second Boer War can be seen by clicking HERE